From Vagrant to Docker: How to use Docker for local web development
Last updated: 2020-03-05 :: Published: 2015-12-18 :: [ history ]You can also subscribe to the RSS or Atom feed, or follow me on Twitter.
Heads-up!This is old content. I published an up to date, more complete tutorial series about using Docker for local web development, which I invite you to read instead.
If you are somewhat following what's happening in the tech world, you must have heard of Docker.
If you haven't, first, get out of your cave, and then, here is a short description of the thing, borrowed from Wikipedia:
Docker is an open-source project that automates the deployment of applications inside software containers, by providing an additional layer of abstraction and automation of operating-system-level virtualization on Linux.
"Wow, cool. What the hell does that mean tho?" I hear you say. Hang on! It goes on, saying that:
[it allows] independent "containers" to run within a single Linux instance, avoiding the overhead of starting and maintaining virtual machines.
Hmm ok. It starts to sound familiar and vaguely useful.
I don't know about you, but working on a Mac (and previously on a Windows machine) (shush), I set up a Vagrant box for almost every single project I work on (if you have no clue what Vagrant is, please take a look at this post first, especially this short bit).
Whenever I need to work on any of these projects, I run a quick vagrant up and get it running in its own isolated virtual machine (VM) in a matter of minutes. Pretty handy.
But that's still a few minutes to get up and running, and having a VM for each project quickly ends up taking a shitload of resources and space on the disk. You could take Laravel's initial approach with Homestead and run several projects on the same VM, but it kinda defeats the purpose of having isolated environments.
So what does Docker have to do with this?
Well, the promise behind it is to provide isolated environments running on a same virtual machine (with Boot2Docker) that starts in about five seconds.
"So... I could replace all my Vagrant boxes with a single super-fast VM running Docker?"
Exactamundo.
And that's what we are going to do today, step by step.
Table of contents
Installation
As mentioned earlier, I'm working on a Mac, so this tutorial will be written from a Mac user point of view. That being said, in practice, once the installation is done, the way Docker is used shouldn't differ much (if at all). So, whether you're on a Mac or a PC, just head over here, download and install Docker Toolbox and follow the instructions for your platform (Mac OS, Windows) (or, if you're a Linux user, go straight to the specific installation guide - no need to get Docker Toolbox).
As stated on the website, Docker Toolbox will install all the stuff you need to get started.
Follow the steps of the Get Started with Docker guide all the way down to the Tag, push, and pull your image section: it's all very clear and well written and will even help you get your bearings with the terminal if you're not familiar with it.
I'll take it from there.
In the meantime, here is a dancing Tyrion:

Note: You might get this kind of error when trying to complete the first step:
Network timed out while trying to connect to https://index.docker.io/v1/repositories/library/hello-world/images. You may want to check your internet connection or if you are behind a proxy.
In that case, simply run docker-machine restart default and try again.
All good? Well done.
By now, you should have a virtual machine running with VirtualBox (the virtualisation software used by default under the hood) and know how to find, run, build, push and pull images, and have a better idea of what Docker is and how it works.
That's pretty cool already, but not exactly concrete. How do you get to the point where you open your browser and display the website you are currently building and interact with a database and everything?
Stick with me.
Setup
Everything we'll do under this section is available as a GitHub repository you can refer to if you get stuck at any time (you can also directly use it as is if you want).
Also, as you may have noticed I already started to use the terms virtual machine and VM to refer to the same thing. I will sometimes mention a Docker machine as well. Don't get confused: they are all the same.
Now that this is clear, let's decide on the technologies. I usually work with the LEMP stack, and I would like to get my hands on PHP7, so let's go for a Linux/PHP7/Nginx/MySQL stack (we'll see how to throw a framework into the mix in another post).
As we want to have the different parts of the stack to run in separate containers, we need a way to orchestrate them: that's when Docker Compose comes in.
A lot of tutorials will teach you how to set up a single container first, or a couple of and how to link them together using Docker commands, but in real life it is very unlikely that only one or two containers are going to be needed, and using simple Docker commands to link more containers to each other can quickly become a pain in the bottom.
Docker Compose allows you to describe your stack specifying the different containers that will compose it through a YAML config file. As the recommended practice is to have one process per container, we will separate things as follows:
- a container for Nginx
- a container for PHP-FPM
- a container for MySQL
- a container for phpMyAdmin
- a container to make MySQL data persistent
- a container for the application code
Another common thing among the tutorials and articles I came through is that their authors often use their own images, which I find somewhat confusing for the newcomers, especially as they rarely explain why they do so.
Here, we'll use the official images and extra Dockerfiles to extend them.
Nginx
But first, let's start with an extremely basic configuration to make sure everything is working properly and that we're all on the same page (this will also allow you to familiarise with a few commands in the process).
Create a folder for your project (I named mine docker-tutorial) and add a docker-compose.yml file into it, with this content:
nginx:
    image: nginx:latest
    ports:
        - 80:80
Save it and, from that same folder in your terminal, run:
$ docker-compose up -d
It might take a little while as the Nginx image needs to be pulled first. When it is done, run:
$ docker-machine ip default
Copy the IP address that displays and paste it in the address bar of your favourite browser. You should see Nginx's welcome page:
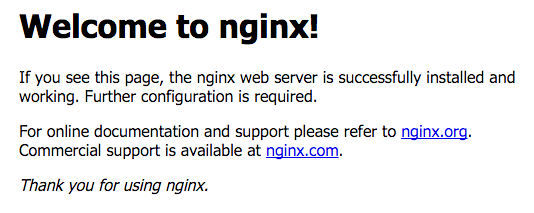
Nice! So what did we do here?
First we told Docker Compose that we wanted a container named nginx to use the latest official Nginx image and publish its port 80 (the standard port used by HTTP) on the port 80 of our host machine (that's my Mac in my case).
Then we asked Docker Compose to build and start the containers described in docker-compose.yml (just one so far) with docker-compose up. Option -d allows to have the containers running in the background and gives the terminal back.
Finally, we displayed the private IP address of the virtual machine created by Docker and named default (you can check this running docker-machine ls, which will give you the list of running machines).
As we published the port 80 of this virtual machine, we can access it from our host machine.
One last thing to observe before we move on: in your terminal, type docker ps. You should see something like that:

That's the list of all the running containers and the images they use. For now we only have one container, using the official Nginx image. Here its name is dockertutorial_nginx_1: Docker Compose came up with it using the name of the current directory and the image's and appended a digit to prevent name collisions.
PHP
Still following? Good. Now let's try and add PHP and a custom index.php file to be displayed when accessing the machine's private IP.
Replace the content of docker-compose.yml with this one:
nginx:
    build: ./nginx/
    ports:
        - 80:80
    links:
        - php
    volumes:
        - ./www/html:/var/www/html

php:
    image: php:7.0-fpm
    expose:
        - 9000
    volumes:
        - ./www/html:/var/www/html
A few things here: we added a new container named php, which will use the official PHP image, and more specifically the 7.0-fpm tag. As this image doesn't expose the port 9000 by default, we specify it ourselves.
At this point you might be wondering what is the difference between expose and ports: the former allows to expose some ports to the other containers only, and the latter makes them accessible to the host machine.
We also added a volumes key. What we're saying here is that the directory ./www/html must be mounted inside the container as its /var/www/html directory. To simplify, it means that the content of ./www/html on our host machine will be in sync with the container's /var/www/html directory. It also means that this content will be persistent even if we destroy the container.
More on that later.
Note: If you have trouble mounting a local folder inside a container, please have a look at the corresponding documentation.
The nginx container's config has been slightly modified as well: it got the same volumes key as the php one (as the Nginx container needs an access to the content to be able to serve it), and a new links key appeared. We are telling Docker Compose that the nginx container needs a link to the php one (don't worry if you are confused, this will make sense soon).
Finally, we replaced the image key for a build one, pointing to a nginx/ directory inside the current folder. Here, we tell Docker Compose not to use an existing image but to use the Dockerfile from nginx/ to build a new image.
If you followed the get started guide, you should already have an idea of what a Dockerfile is. Basically, it is a file allowing to describe what must be installed on the image, what commands should be run on it, etc.
Here is what ours looks like (create a Dockerfile file with this content under a new nginx/ directory):
FROM nginx:latest

COPY ./default.conf /etc/nginx/conf.d/default.conf
Not much to see, eh!
We start from the official Nginx image we have already used earlier and we replace the default configuration it contains with our own (might be worth noting that by default the official Nginx image will only take files named following the pattern *.conf and under conf.d/ into account - a mere detail but it drove me crazy for almost three hours at the time).
Let's add this default.conf file into nginx/:
server {
    listen 80 default_server;
    root /var/www/html;
    index index.html index.php;

    charset utf-8;

    location / {
        try_files $uri $uri/ /index.php?$query_string;
    }

    location = /favicon.ico { access_log off; log_not_found off; }
    location = /robots.txt  { access_log off; log_not_found off; }

    access_log off;
    error_log  /var/log/nginx/error.log error;

    sendfile off;

    client_max_body_size 100m;

    location ~ \.php$ {
        fastcgi_split_path_info ^(.+\.php)(/.+)$;
        fastcgi_pass php:9000;
        fastcgi_index index.php;
        include fastcgi_params;
        fastcgi_param SCRIPT_FILENAME $document_root$fastcgi_script_name;
        fastcgi_intercept_errors off;
        fastcgi_buffer_size 16k;
        fastcgi_buffers 4 16k;
    }

    location ~ /\.ht {
        deny all;
    }
}
It is a very basic Nginx server config.
What is interesting to note here however is this line:
fastcgi_pass php:9000;
We are asking Nginx to proxy the requests to the port 9000 of our php container: that's what the links key from the config for the nginx container in the docker-compose.yml file was for!
We just need one more file - index.php, inside www/html under the current directory:
<!DOCTYPE html>
<html lang="en">
    <head>
        <meta charset="utf-8">
        <title>Hello World!</title>
    </head>
    <body>
        <img src="https://tech.osteel.me/images/2015/12/18/docker-tutorial2.gif" alt="Hello World!" />
    </body>
</html>
Yes, it only contains HTML but we just want to make sure that PHP files are correctly served.
Here is what your tree should look like by now:
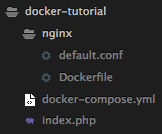
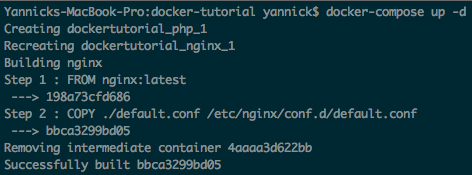
Go back to your terminal and run docker-compose up -d again. Docker Compose will detect the configuration changes and build and start the containers again (it will also pull the PHP image):
Browse the virtual machine's private IP again (docker-machine ip default if you closed the tab): you should be greeted by a famous Doctor.
Now type docker ps in your terminal to display the list of running containers again:

We can see a new one appeared, using the official PHP image, and the Nginx one looks a bit different from the previous one: Docker Compose used the Dockerfile to automatically build a new image from the official Nginx one, and used it for the container.
Now if you remember, I said earlier that the current directory is in sync with the containers' (because of the volumes key in docker-compose.yml). Let's check if I'm not a liar: open index.php and change the page title for "Hello Universe!", for example. Save and reload the page.
See the change? Sweet.
Now we have got two containers for Nginx and PHP, talking to each other and serving files we can update from our host machine and see the result instantly.
Time to add some database madness!
Data
Volumes and data containers
Before we actually dive into the configuration of MySQL, let's have a closer look at this volumes thing. Both the nginx and php containers have the same directory mounted inside, and it's common practice to use what is called a data container to hold this kind of data.
In other words, it's a way to factorise the access to this data by other containers.
Change the content of docker-compose.yml for the following:
nginx:
    build: ./nginx/
    ports:
        - 80:80
    links:
        - php
    volumes_from:
        - app

php:
    image: php:7.0-fpm
    expose:
        - 9000
    volumes_from:
        - app

app:
    image: php:7.0-fpm
    volumes:
        - ./www/html:/var/www/html
    command: "true"
Several things happened: first, we added a new container named app, using the same volumes parameter as the nginx and php ones. The purpose of this container is solely to hold the application code: when Docker Compose will create it, it is going to be stopped at once as it doesn't do anything apart from executing the command "true". This is not a problem as for the volume to be accessible, the container needs to exist but doesn't need to be running, also preventing the pointless use of extra resources.
Besides, you'll notice that we're using the same PHP image as the php container's: this is a good practice as this image already exists and reusing it doesn't take any extra space (as opposed to using a data-only image such as busybox, as you may see in other tutorials out there).
The other change we made is volumes was replaced with volumes_from in nginx and php's configurations and both are pointing to this new app container. This is quite self-explanatory, but basically we are telling Docker Compose to mount the volumes from app in both these containers.
Run docker-compose up -d again and make sure you can still access the virtual machine's private IP properly.
Running docker ps now should display this:

"Wait a minute. Where's the app container?"
I'm glad you asked. If you recall I've just said that the container was stopped right after its creation, and docker ps only displays the running containers.
Now run docker ps -a:

There it is!
If you're interested in reading more about data containers and volumes (and I encourage you to do so), I'd suggest this article by Adrian Mouat which gives a good overview (you will also find all the sources I used at the end of this article).
MySQL
Alright! Enough digression, back to MySQL.
Open docker-compose.yml again and add this at the end:
mysql:
    image: mysql:latest
    volumes_from:
        - data
    environment:
        MYSQL_ROOT_PASSWORD: secret
        MYSQL_DATABASE: project
        MYSQL_USER: project
        MYSQL_PASSWORD: project

data:
    image: mysql:latest
    volumes:
        - /var/lib/mysql
    command: "true"
And update the config for the php container to add a link to the mysql one and use a Dockerfile to build the image:
php:
    build: ./php/
    expose:
        - 9000
    links:
        - mysql
    volumes_from:
        - app
You already know what the purpose of the links parameter is, so let's have a look at the new Dockerfile:
FROM php:7.0-fpm

RUN docker-php-ext-install pdo_mysql
Again, not much in there: we simply install the pdo_mysql extension so we can connect to the database (see How to install more PHP extensions from the image's doc). Put this file in a new php/ directory.
Moving on to the MySQL configuration: we start from the official MySQL image, and as you can see there is a new environment key we haven't met so far: it allows to declare some environment variables that will be accessible in the container. More specifically here, we set the root password for MySQL, and a name (project), a user and a password for a database to be created (all the available variables are listed in the image's documentation).
Following the same principle as exposed earlier, we also declare a data container whose aim is only to hold the MySQL data present in /var/lib/mysql on the container (and reusing the same MySQL image to save disk space). You might have noticed that, unlike what we were doing so far, we do not declare a specific directory on the host machine to be mounted into /var/lib/mysql (normally specified before the colon): we don't need to know where this directory is, we just want its content to persist, so we let Docker Compose handle this part.
Although that does not mean we have no idea where this folder sits - but we'll have a look at this later.
One thing worth noting right now tho, is that if this volume already contains MySQL data, the MYSQL_ROOT_PASSWORD variable will be ignored and if the MYSQL_DATABASE already exists, it will remain untouched.
In order to be able to test the connection to the database straight away, let's update the index.php file a bit:
<!DOCTYPE html>
<html lang="en">
    <head>
        <meta charset="utf-8">
        <title>Hello World!</title>
    </head>
    <body>
        <img src="https://tech.osteel.me/images/2015/12/18/docker-tutorial2.gif" alt="Hello World!" />
        <?php
        $database   = $user = $password = "project";
        $host       = "mysql";
        $connection = new PDO("mysql:host={$host};dbname={$database};charset=utf8", $user, $password);
        $query      = $connection->query("SELECT TABLE_NAME FROM information_schema.TABLES WHERE TABLE_TYPE='BASE TABLE'");
        $tables     = $query->fetchAll(PDO::FETCH_COLUMN);

        if (empty($tables)) {
            echo "<p>There are no tables in database \"{$database}\".</p>";
        } else {
            echo "<p>Database \"{$database}\" has the following tables:</p>";
            echo "<ul>";
            foreach ($tables as $table) {
                echo "<li>{$table}</li>";
            }
            echo "</ul>";
        }
        ?>
    </body>
</html>
This script will try to connect to the database and list the tables it contains.
We're all set! Run docker-compose up -d in your terminal again, followed by docker ps -a (again, it might take a little while as the MySQL image needs to be pulled). You should see five containers, two of which are exited:

Now refresh the browser tab: "There are no tables in database 'project'" should appear.
Event though the next point is about phpMyAdmin and you will be able to use it to edit your databases, I am now going to show you how to access the running MySQL container and use the MySQL command line interface.
From the result of the previous command, copy the running MySQL container ID (5207587d116b in our case) and run:
$ docker exec -it 5207587d116b /bin/bash
You are now running an interactive shell in this container (you can also use its name instead of its ID).
docker exec allows to execute a command in a running container, -t attaches a terminal and -i makes it interactive. Finally, /bin/bash is the command that is run and creates a bash instance inside the container.
Of course, you can use the same command for other containers too.
From there, all you need to do is run mysql -uroot -psecret to enter the MySQL CLI. List the databases running show databases;:
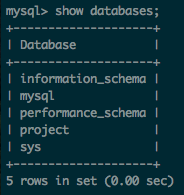
Change the current database for project and create a new table:
$ mysql> use project
$ mysql> CREATE TABLE users (id int);
Refresh the project page: the table users should now be listed.
You can exit the MySQL CLI entering \q and the container with ctrl + d.
There is one question about the MySQL data we haven't answered yet: where does it sit on the host machine?
Earlier we set up the data container in docker-compose.yml as follows:
data:
    image: mysql:latest
    volumes:
        - /var/lib/mysql
    command: "true"
That means we let Docker Compose mount a directory of its choice from the host machine into /var/lib/mysql. So where is it?
Run docker ps -a again, copy the ID of the exited MySQL container this time (7970b851b07a in our case) , and run :
$ docker inspect 7970b851b07a
Some JSON data should appear on your screen. Look for the Mounts section:
...,
"Mounts": [
    {
        "Name": "0cd0f26f7a41e40437019d9e5514b237e492dc72a6459da88d36621a9af2599f",
        "Source": "/mnt/sda1/var/lib/docker/volumes/0cd0f26f7a41e40437019d9e5514b237e492dc72a6459da88d36621a9af2599f/_data",
        "Destination": "/var/lib/mysql",
        "Driver": "local",
        "Mode": "",
        "RW": true
    }
],
...
The data contained in the volume sits in the "Source" directory.
"Hmm I see.
But… what happens to the volumes if we remove the containers that hold them?"
Excellent question!
Well, they actually stay around, taking disk space for nothing.
Two solutions for this. First, we can make sure to remove the volumes along with the container using the -v option:
$ docker rm -v containerid
Or, if some containers were removed without the -v option, resulting in dangling volumes:
$ docker volume rm $(docker volume ls -qf dangling=true)
This command uses the docker volume ls command with the q and f options to respectively list the volumes' names only and keep the dangling ones (dangling=true).
Check the Docker command line documentation for more info.
phpMyAdmin
Being able to access a container and deal with MySQL using the command line interface is a good thing, but sometimes it is convenient to have a more friendly user interface. PHPMyAdmin is arguably the de facto choice when it comes to MySQL, so let's set it up using Docker!
Open docker-compose.yml again and add the following:
phpmyadmin:
    image: phpmyadmin/phpmyadmin
    ports:
        - 8080:80
    links:
        - mysql
    environment:
        PMA_HOST: mysql
Once again, we start from the official phpMyAdmin image. We publish its port 80 to the virtual machine's port 8080, we link it to the mysql container (obviously) and we set it as the host using the PMA_HOST environment variable.
Save the changes and run docker-compose up -d again. The image will be downloaded and, once everything is up, visit the project page again, appending :8080 to the private IP (that's how we access the VM's port 8080):
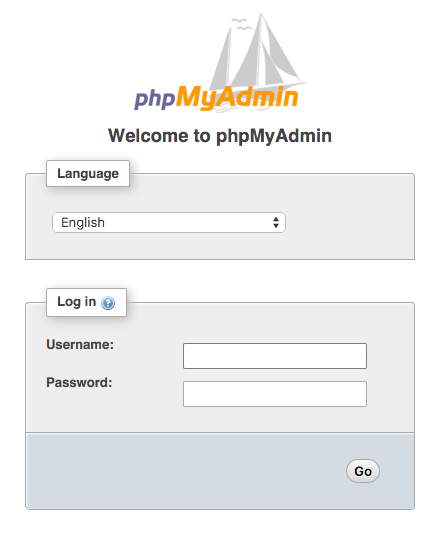
Enter root / secret as credentials and you're in (project / project will work too, giving access to the project database only, as defined in the mysql container configuration).
That one was easy, right?
That's actually it for the setup!
This is a lot to digest already, so taking a break might be a good idea. Don't forget to read on eventually though, as the next couple of sections will most likely clarify a few points.
Again, the setup is also available as a GitHub repository. Feel free to clone it and play around.
Handling multiple projects
One big advantage of using Docker rather than say, multiple Vagrant boxes, is if several containers use the same base images, the disk space usage will only increase by the read-write layer of each container, which is usually only a few megabytes. To put it differently, if you use the same stack for most of your projects, each new project will basically only take a few extra megabytes to run (not taking into account the size of the codebase here, obviously).
Say you want to use the same stack except you need PostgreSQL instead of MySQL. All you need to do is change the database container image for your new project, and all the other containers will reuse the images you already have locally.
Pretty neat.
But how do you concretely deal with several projects using the same virtual machine?
First thing to consider is a Docker machine has only one private IP address, so unless you decide to use a different port per project (which should be absolutely fine), you won't be able to have multiple web projects running on the port 80 at the same time.
That's not really an issue as you can easily stop containers.
You might have noticed that we used docker and docker-compose commands in turn, which might be a tad confusing. To simplify, let's say docker-compose allows to run the same commands as docker, but on all the containers defined in the docker-compose.yml file at once, or for these containers only.
Let's take a couple of examples:
docker ps -a
You already know this command: it displays all the containers of the Docker machine, be they running or not. All of them.
However:
docker-compose ps
will do the same, but for the containers defined in the docker-compose.yml file of the current directory only (you will notice that -a is not necessary and that the order of the displayed info is slightly different).
It comes in handy when you begin to have a lot of containers managed by the same VM. But there is more:
docker-compose stop
will stop all the containers described in the current docker-compose.yml file. Basically when you are done with a project, run this command to stop all its related containers. To connect the dots with what I said above, that will also free the port 80 for another project if need be.
Start them again using the now familiar docker-compose up -d.
You can also delete all the stopped containers of the current project running:
docker-compose rm
Just like its equivalent docker rm, you can add the option -v if you want to remove the corresponding volumes as well (if you don't, you might end up with dangling volumes as already mentioned earlier).
Check the docker and docker-compose references for more details.
Troubleshooting
Obviously, not everything is always going to work at once. Docker Compose might refuse to build an image or start a container and what is displayed in the console is not always very helpful.
When something goes wrong, run:
docker-compose logs
This will display the logs for the containers of the current docker-compose.yml file. You can also run docker-compose ps and check the State column: if there is an exit code different than 0, there was a problem with the container.
Display the logs specific to a container with:
docker logs containerid
The container's name will work too.
Conclusion
Docker is an amazing technology and of course there is much more to it (I'm not even started with deployment and how to use it into production and believe me, it is very promising).
Here we used Docker Toolbox and Boot2Docker for simplicity, because it sets up a lot of things for us automatically, but we could have used a Vagrant box just the same and install Docker on it. There is no obligation whatsoever.
Putting all this together was no trivial exercise, especially as I knew very little about Docker before I started to write this article. It actually took me a couple of days of tinkering around before I started to make any sense of it.
Docker is evolving super quickly and there are many resources out there from which it's not always easy to separate the wheat from the chaff.
I believe I only kept the wheat, but then again I'm still a humble beginner so if you spot some chaff, you are very welcome to let me know about it in the comments.
Sources
- Discovering Docker (e-book)
- How I develop in PHP with CoreOS and Docker
- Docker for PHP Developers
- Understanding Volumes in Docker
- Manage data in containers
- Tips for Deploying NGINX (Official Image) with Docker
- Use the Docker command line
- Compose CLI reference
- Dockerfile reference
You can also subscribe to the RSS or Atom feed, or follow me on Twitter.