How to use Vagrant on Windows
Last updated: 2020-03-05 :: Published: 2015-01-25 :: [ history ]You can also subscribe to the RSS or Atom feed, or follow me on Twitter.
[UPDATE 2020/03/05]: While Vagrant served me well for years, I do not recommend using it for local development anymore and advise to use Docker instead, for which I wrote an entire tutorial series which I invite you to read.
This article shows how to deal with Windows' specificities while trying to work with Vagrant. If you are not familiar at all with the latter, I suggest you go through this Vagrant tutorial first.
Note: the following was tested on Windows 8, but the steps described below shouldn't change too much between the different versions.
Vagrant ssh
The first issue I came across was that vagrant ssh doesn't work out of the box. I was greeted with a constructive message:
`ssh` executable not found in any directories in the %PATH% variable. Is an SSH client installed? Try installing Cygwin, MinGW or Git, all of witch contain an SSH client. Or use your favorite SSH client with the following authentication information shown below:

Host: 127.0.0.1
Port: 2222
Username: vagrant
Private key: C:/path/to/project/.vagrant/machines/default/virtualbox/private_key
Fine. Let's install Git, then (considering it is not already the case).
Git install
The key is when the "Adjusting your PATH environment" screen pops up:
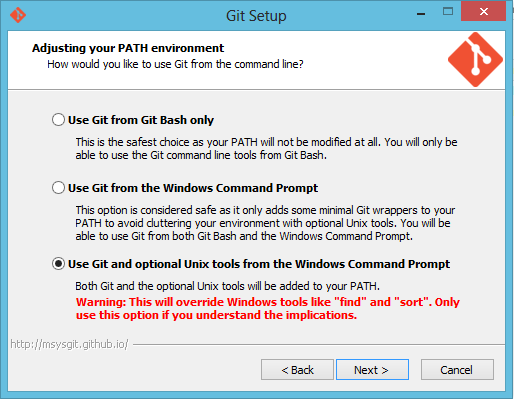
You want to select "Use Git and optional Unix tools from the Windows Command Prompt".
Now I know the message in red looks quite scary, but honestly, unless you are a hardcore user of the Windows console, there is not much to worry about. Basically it will override some of the commands and add a few others.
Personally, it never caused me any trouble.
If you are still a bit worried tho, be reassured: none of this is irreversible. All you would need to do is uninstall Git, or update the PATH variable removing the incriminated part.
More on that in a minute.
Try to vagrant ssh your VM again, this time it should do it (you might need to open a new terminal for the update to take effect, tho).
What if Git is installed already?
Well, it was the case for me as well.
You could always remove it and install it again, but there is another way.
You will have to do manually what the installation of Git could have done for you, but fortunately it is quite trivial:
- Open the Control Panel
- Go to System and Security
- Click on System, then on the Change Settings button
- Display the Advanced tab and click on Environment Variables...
- Look for the Path variable in the System variables list, select it then Edit...
At the end of the string, add the path to Git's bin (something like "C:\Program Files\Git\bin") (don't forget to add a semicolon first to separate it from the previous path):
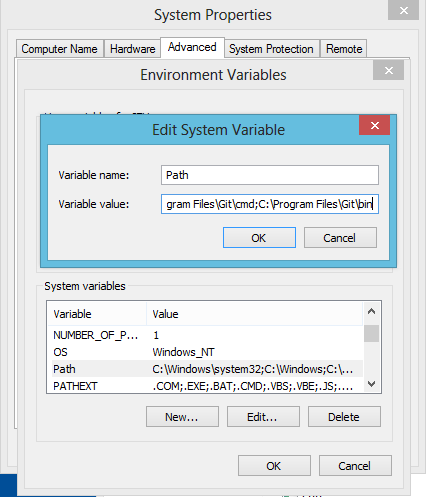
Validate and close the different menus. Try to vagrant ssh your box again, it should work (again, you might need to open a new terminal first).
You probably guessed it already, but if you don't want Git's commands to override the Windows ones anymore, all you need to do is to remove that bit.
You will need to find another way for ssh to work though!
Ah, but wait. There is another way.
PuTTY
Remember that error message we initially got trying to ssh the box? Let's have a look at the second part of it:
Or use your favorite SSH client with the following authentication information shown below:

Host: 127.0.0.1
Port: 2222
Username: vagrant
Private key: C:/path/to/project/.vagrant/machines/default/virtualbox/private_key
I wasn't joking when I said it was constructive, because it really tells you what to do.
The Windows console works ok but let's be honest, in the long run it is a real pain to use. It does the trick for a quick vagrant ssh but when the time comes to actually do some work on an Ubuntu server for example, a better shell is desirable.
Enter PuTTY
PuTTY is a very lightweight tool that allows to do a lot of cool stuff. Some of you are probably familiar with it already, and using it jointly with Vagrant is quite nice.
We will use it to ssh our boxes, and rely on the info given by the message above to that purpose.
First, download it if that is not the case already (the first putty.exe link will do).
Download puttygen.exe as well, we are going to need it.
PuTTY and PuTTYGen are stand-alone applications (no need to install them), so just double click on the .exe files.
Let's open PuTTYGen first: PuTTY uses its own key format, and we need to convert Vagrant's one first. Click on File then Load private key, select the file indicated by the error message earlier (e.g. "C:/path/to/project/.vagrant/machines/default/virtualbox/private_key").
Once selected, PuTTY is kind enough to tell us what to do with it:
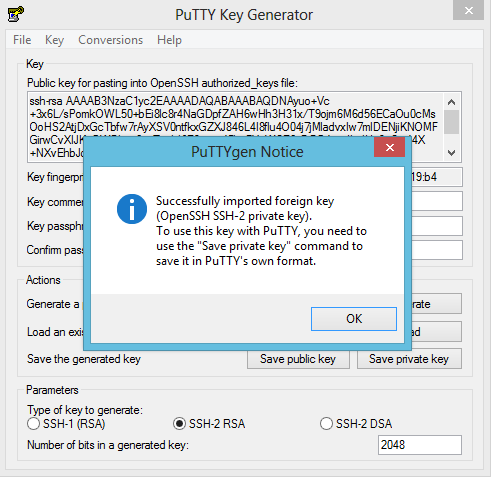
Ensure SSH-2 RSA is selected, and that the number in Number of bits in a generated key is 2048. Then click on Save private key (don't set a passphrase) and save it under your own user directory's .ssh folder, as "vagrant_private_key". From now on, we will use this key for all the Vagrant boxes.
Close PuTTYGen and open PuTTY. In the Hostname field, type 127.0.0.1. In the Port one, 2222. Ensure SSH is selected and, in the Saved Sessions field, type vagrant and click Save:
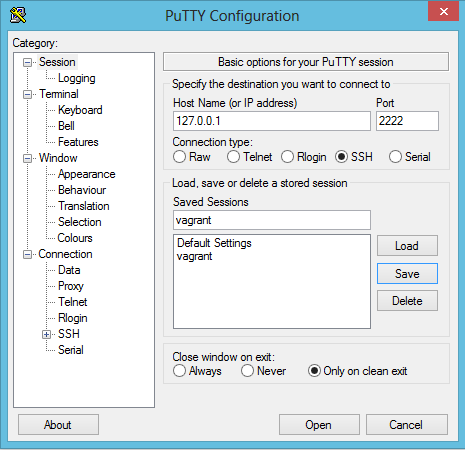
Go to Connection then Data, and in the Auto-login username field, enter "vagrant":
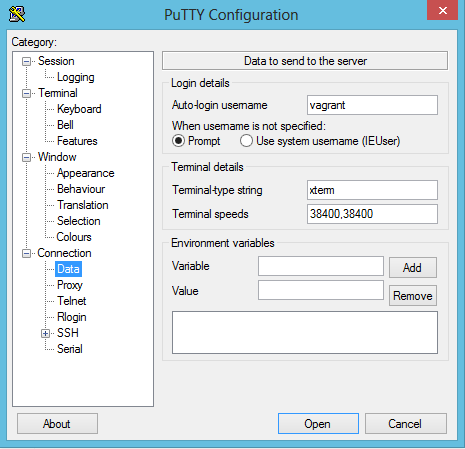
Next, still under Connection, go to SSH then Auth. Browse for the key you generated earlier in the Private key file for authentication field. Now head back to the Session menu, save again the "vagrant" one.
Now click on Open: if everything went alright, you should now be in your Vagrant box \(^o^)/
Using multiple Vagrant boxes simultaneously
Now let's say you already have a box running, and you need to start a second one. You vagrant up it, the Virtual Machine boots and you want to SSH it. But all the boxes cannot use the same SSH port!
It all happens when the box is being booted:
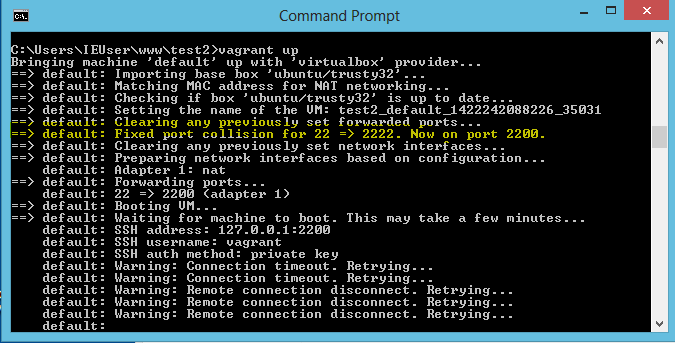
See the highlighted line? Seeing port 2222 was busy already, Vagrant picked the port 2200 instead.
Now to SSH it using PuTTY, open it, load the "vagrant" session, and in the Port field, replace "2222" with "2200". Click Open: there you are, connected to the second box.
Known limitations
Shared folders and symlinks
One of the fairly known limitations of using Vagrant on Windows with VirtualBox is that the latter won't let you create symlinks on the shared folders for security reasons. This quickly becomes problematic when dealing with npm packages, for example.
One of the workarounds is to use the "no bin link" parameter (e.g. npm install --no-bin-link), but this is not always enough.
Fortunately, there is a way to bypass this restriction. In your Vagrantfile, add the following piece of config:
config.vm.provider "virtualbox" do |v|
  v.customize ["setextradata", :id, "VBoxInternal2/SharedFoldersEnableSymlinksCreate/v-root", "1"]
end
As Windows won't let standard users create symlinks, you now need to start your Vagrant box in administrator mode (open a Windows terminal in admin mode before running vagrant up, for example). Make sure no other box is already running though, as it won't start if VirtualBox is already running in standard mode.
Maximum path length
Another recurring problem comes from the fact that Windows' maximum length for a path is 255 characters. Again, this is quickly an issue when dealing with npm packages, especially when they have dependencies, themselves having dependencies, etc.
The solution in that case is to create a symbolic link between the "node_modules" directory and another directory outside of the shared folders.
Which brings us to our practical example.
Practical example: npm packages
So you have this project relying on npm packages. You tried to install them using --no-bin-link but no luck, looks like some of the paths are too long.
Fear not, Macless: update your Vagrant config as shown above to allow the creation of symlinks, boot your VM in admin mode, create a destination directory for your npm packages somewhere outside of the shared folder and create a symlink between it and the "node_modules" one:
mkdir ~/node_modules
ln -s /home/vagrant/node_modules /vagrant/node_modules
cd /vagrant
npm install
Et voilà.
Note: this implies preventing the "node_modules" directory from being versionned.
Conclusion
Here you go, now using Vagrant on Windows in decent conditions.
The process can look a bit convoluted, and really it is. It took me quite a while to put everything together, and if today I am rather satisfied, I am still a bit bugged about the multiple Vagrant boxes part. Having to check the SSH port and update it in the PuTTY session everytime is a bit annoying, even though dealing with several instances at the same time might be an edge case.
Anyways, if you have any suggestions about that, don't hesitate to leave a comment.
You can also subscribe to the RSS or Atom feed, or follow me on Twitter.
