Laravel Homestead: debug an API with Xdebug and cURL in Sublime Text
Published: 2015-05-23 :: [ history ]You can also subscribe to the RSS or Atom feed, or follow me on Twitter.
Foreword
There are a few tutorials out there about how to set up Sublime Text and Xdebug so they play nice together. The good news is that in our case, Homestead has covered the configuration of Xdebug for us: the tool is already available and reporting for duty.
You will find its settings in /etc/php5/fpm/conf.d/20-xdebug.ini, which should look like this:
zend_extension=xdebug.so
xdebug.remote_enable = 1
xdebug.remote_connect_back = 1
xdebug.remote_port = 9000
xdebug.max_nesting_level = 250
I won't go into more detail about this, but you can have a look at this post by sitepoint for a more complete explanation.
Might be worth mentioning that my host machine runs Mac OS, and the steps below might slightly differ if you are on a different OS.
Prerequisites
This is assuming Homestead is installed on your machine and that you've got a basic knowledge of it. If you are confused by the documentation, this free Laracast might help. I also wrote a short guide on how to set up a basic PHP/MySQL project on Homestead.
We will use a small Laravel project (v5.0.31) for testing purpose, which you can clone from this repository, inside a directory of your choice (you probably already have one containing your Laravel projects):
git clone git@github.com:osteel/xdebug-api-blog-tutorial.git xdebug-api
Add the site in your ~/.homestead/Homestead.yaml file:
sites:
    - map: xdebug-api.local
      to: /home/vagrant/path/to/xdebug-api/public
Where /path/to/ should be replaced with the path to the project on your Homestead box.
Match the Homestead IP address with "xdebug-api.local" in your local hosts file (/etc/hosts on a Mac) (of course, adapt the IP address if you changed the default one):
192.168.10.10 xdebug-api.local
You should now re-provision your Homestead box. Go to ~/Homestead/ and run vagrant provision if the box is already running, or vagrant up --provision if it needs to be started.
You should now be able to access http://xdebug-api.local, which should display the Laravel welcome page.
Sublime Text
We first need to get the Xdebug Client package for Sublime.
If you've never installed any package before, the easiest way is to install package control first. Follow the steps, then hit shift + cmd + p in Sublime (or shift + ctrl + p on Windows) and type "install" until the "Package Control: Package Install" entry appears:

Hit enter and wait for the packages input to display. Type "xdebug" and hit enter after having selected the Xdebug Client one to install it.
We now need to set up a Sublime Text project.
Open the project folder in Sublime, then go to the "Project" menu, "Save Project As...". Name it "xdebug-api.sublime-project" and save it at the root. Open it and replace its content with:
{
    "folders":
    [
        {
            "follow_symlinks": true,
            "path": "."
        }
    ],
    "settings": {
        "xdebug": {
             "url": "http://xdebug-api.local/",
             "path_mapping": {
                "/home/vagrant/path/to/xdebug-api/" : "/path/to/xdebug-api/"
             }
        }
    }
}
where the two occurrences of /path/to/ should be replaced with the path to the project on the Homestead box and the path to the project on your host machine respectively.
Using Xdebug
Let's make sure everything is correctly set up.
The project is extremely simple and offers a couple of endpoints, both in the WelcomeController.php file and declared in routes.php.
One will receive GET requests and the other POST ones (corresponding to the get and post methods in WelcomeController.php).
Route::get('/', 'WelcomeController@index');
Route::get('/get', 'WelcomeController@get');
Route::post('/post', 'WelcomeController@post');
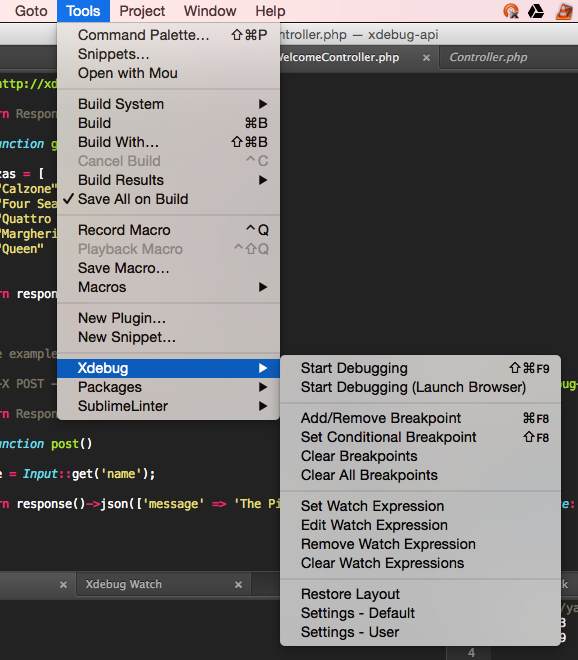
Since we installed the package, there is a new "Xdebug" menu available under "Tools":

Add a breakpoint in the index method of WelcomeController.php (notice the circle on the left):

Now start the debugging mode ("Tools", "Xdebug", "Start Debugging (Launch Browser)"): your default browser will open http://xdebug-api.local/?XDEBUG_SESSION_START=sublime.xdebug. The page should just hang in there, and switching back to Sublime Text you should see something like that:

The script execution stopped at your breakpoint, and Xdebug displays information about the different objects available at this point and their values in the panels at the bottom.
Now you might think that you could basically test all the GET endpoints of your API this way, and you would not be entirely wrong.
But how about other methods (POST, PUT, etc.)? And what if you need a specific header, such as a bearer token?
That's where cURL comes in handy.
cURL
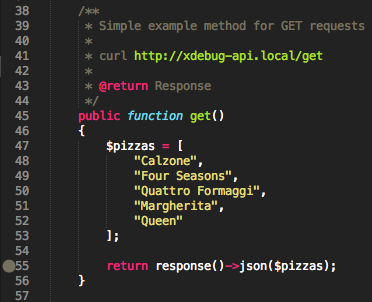
First let's add another breakpoint, in the get method this time:

Open a terminal on your host machine and run (cURL is available on Mac OS by default, but you might need to install it if you use another platform):
curl http://xdebug-api.local/get
You should get an array of pizzas in JSON format. The breakpoint was ignored, the reason being Xdebug needs a cookie to be read so its session can be started (that's what happens when you append "?XDEBUG_SESSION_START=sublime.xdebug" to the URL: a cookie is created).
What we are going to do is to "add" this cookie to the cURL call. Now run:
curl -b "XDEBUG_SESSION=sublime.xdebug" http://xdebug-api.local/get
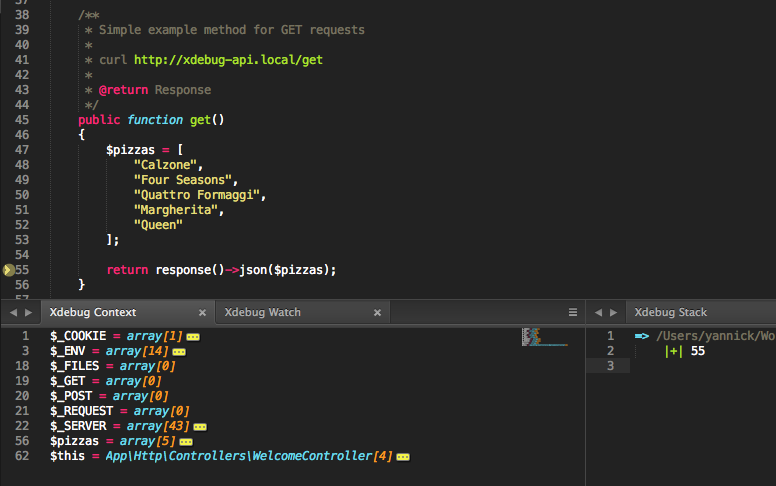
The script execution should stop at the breakpoint and Sublime Text should look like:

What happened here is we told cURL to pass a cookie to the request, created from a string ("XDEBUG_SESSION=sublime.xdebug").
Now let's try a POST request.
Create a new breakpoint in the post method:

And run:
curl -b "XDEBUG_SESSION=sublime.xdebug" -X POST -H "Content-Type: application/json" -d '{"name":"Pepperoni"}' http://xdebug-api.local/post
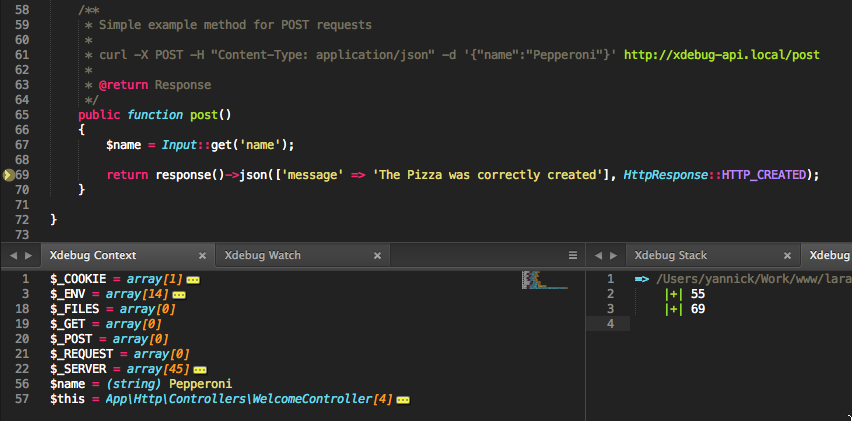
Displaying back Sublime Text; you should get something like:

To explain the command a little bit:
-Xallows to specify the method (GETby default)-Hallows to specify headers-dallows to pass some data (here, some JSON)
There are many things you can do with cURL, that should cover pretty much all the cases presented by your API. I encourage you to have a look at its documentation.
Extra considerations
Alias
You will probably agree that having to type -b "XDEBUG_SESSION=sublime.xdebug" every time is somewhat annoying.
To speed up the process a little bit, I use an alias command I named curlx. To add it on a Mac for example, edit ~/.bash_profile:
vim ~/.bash_profile
Add this line:
alias curlx='curl -b "XDEBUG_SESSION=sublime.xdebug"'
Then source the file so the new alias is taken into account:
source ~/.bash_profile
And run:
curlx http://xdebug-api.local/get
If the breakpoint previously set in the get method is still active, your script should stop there.
cURL command handy
You may also have noticed that I put a cURL command in the description of each method in WelcomeController.php:

I do so so I can test them quickly, with a terminal open on the side.
How to use Xdebug
Finally, this tutorial doesn't actually explain how you might use Xdebug. For concrete examples, you can watch a couple of Laracast videos (free upon opening an account):
- Xdebug (from 5'20'')
- Xdebug and Laravel
These videos were shot using PHPStorm, but the described processes apply all the same.
You can also subscribe to the RSS or Atom feed, or follow me on Twitter.