Docker for local web development, part 5: HTTPS all the things
Last updated: 2023-07-10 :: Published: 2020-04-27 :: [ history ]You can also subscribe to the RSS or Atom feed, or follow me on Twitter.
In this series
- Introduction: why should you care?
- Part 1: a basic LEMP stack
- Part 2: put your images on a diet
- Part 3: a three-tier architecture with frameworks
- Part 4: smoothing things out with Bash
- Part 5: HTTPS all the things ⬅️ you are here
- Part 6: expose a local container to the Internet
- Part 7: using a multi-stage build to introduce a worker
- Part 8: scheduled tasks
- Conclusion: where to go from here
Subscribe to email alerts at the end of this article or follow me on Twitter to be informed of new publications.
In this post
Introduction
Since its inception by Netscape Communications back in 1994, Hypertext Transfer Protocol Secure (HTTPS) has been spreading over the Internet at an ever increasing rate, and now accounts for more than 80% of global traffic (as of February 2020). This growth in coverage has been particularly strong in the past few years, catalysed by entities like the Internet Security Research Group – the one behind the free certificate authority Let's Encrypt – and companies like Google, whose Chrome browser has flagged HTTP websites as insecure since 2018.
While it is getting ever cheaper and easier to encrypt the web, somehow this evolution doesn't extend to local environments, where bringing in HTTPS is still far from a sinecure.
This article intends to ease the pain by showing you how to generate a self-signed SSL/TLS certificate and how to use it with our Docker-based setup, thus getting us one step closer to perfectly mimicking a production environment.
The assumed starting point of this tutorial is where we left things at the end of the previous part, corresponding to the repository's part-4 branch.
If you prefer, you can also directly checkout the part-5 branch, which is the final result of today's article.
Generating the certificate
We will generate the certificate and its key in a new certs folder under .docker/nginx – create that folder and add the following .gitignore file to it:
1 2 | *
!.gitignore
|
These two lines mean that all of the files contained in that directory except for .gitignore will be ignored by Git (this is a nicer version of the .keep file you may sometimes encounter, which aims to version an empty folder in Git).
Since one of the goals of using Docker is to avoid cluttering the local machine as much as possible, we'll use a container to install OpenSSL and generate the certificate. Nginx's is a logical choice for this – being our proxy, it will be the one receiving the encrypted traffic on port 443, before redirecting it to the right container:
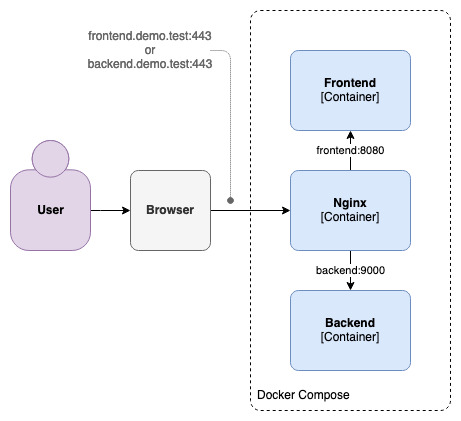
We need a Dockerfile for this, which we'll add under .docker/nginx:
1 2 3 4 | FROM nginx:1.21-alpine
# Install packages
RUN apk --update --no-cache add openssl
|
We also need to update docker-compose.yml to reference this Dockerfile and mount the certs folder onto the Nginx container, to make the certificate available to the web server. Also, since the SSL/TLS traffic uses port 443, the local machine's port 443 must be mapped to the container's (as always, changes have been highlighted in bold):
# Nginx Service
nginx:
  build: ./.docker/nginx
  ports:
    - 80:80
    - 443:443
  volumes:
    - ./src/backend:/var/www/backend
    - ./.docker/nginx/conf.d:/etc/nginx/conf.d
    - phpmyadmindata:/var/www/phpmyadmin
    - ./.docker/nginx/certs:/etc/nginx/certs
  depends_on:
    - backend
    - frontend
    - phpmyadmin
Build the new image:
$ demo build nginx
All the tools necessary to generate our certificate are now in place – we just need to add the corresponding Bash command and function.
First, let's update our application menu, at the bottom of the demo file:
Command line interface for the Docker-based web development environment demo.

Usage:
    demo  [options] [arguments]

Available commands:
    artisan ................................... Run an Artisan command
    build [image] ............................. Build all of the images or the specified one
    cert ...................................... Certificate management commands
        generate .............................. Generate a new certificate
        install ............................... Install the certificate
    composer .................................. Run a Composer command
    destroy ................................... Remove the entire Docker environment
    down [-v] ................................. Stop and destroy all containers
                                                Options:
                                                    -v .................... Destroy the volumes as well
    init ...................................... Initialise the Docker environment and the application
    logs [container] .......................... Display and tail the logs of all containers or the specified one's
    restart [container] ....................... Restart all containers or the specified one
    start ..................................... Start the containers
    stop ...................................... Stop the containers
    update .................................... Update the Docker environment
    yarn ...................................... Run a Yarn command
To save us a trip later, I've also added the menu for the certificate installation, even if we won't implement it just yet.
Add the corresponding cases to the switch:
1 2 3 4 5 6 7 8 9 10 11 12 13 14 15 16 17 18 19 20 21 22 23 24 | cert)
case "$2" in
generate)
cert_generate
;;
install)
cert_install
;;
*)
cat << EOF
Certificate management commands.
Usage:
demo cert <command>
Available commands:
generate .................................. Generate a new certificate
install ................................... Install the certificate
EOF
;;
esac
;;
|
Since there are a couple of subcommands for cert, I've also added a submenu describing them. Save the file and check out the look of the new menus:
$ demo
$ demo cert
The second command should display something like this:

Still in the demo file, add the cert_generate function:
1 2 3 4 5 | # Generate a wildcard certificate
cert_generate () {
rm -Rf .docker/nginx/certs/demo.test.*
docker compose run --rm nginx sh -c "cd /etc/nginx/certs && touch openssl.cnf && cat /etc/ssl1.1/openssl.cnf > openssl.cnf && echo \"\" >> openssl.cnf && echo \"[ SAN ]\" >> openssl.cnf && echo \"subjectAltName=DNS.1:demo.test,DNS.2:*.demo.test\" >> openssl.cnf && openssl req -x509 -sha256 -nodes -newkey rsa:4096 -keyout demo.test.key -out demo.test.crt -days 3650 -subj \"/CN=*.demo.test\" -config openssl.cnf -extensions SAN && rm openssl.cnf"
}
|
The first line of the function simply gets rid of previously generated certificates and keys that may still be in the certs directory. The second line is quite long and a bit complicated, but essentially it brings up a new, single-use container based on Nginx's image (docker compose run --rm nginx) and runs a bunch of commands on it (that's the portion between the double quotes, after sh -c).
I won't go into the details of these, but the gist is they create a wildcard self-signed certificate for *.demo.test as well as the corresponding key. A self-signed certificate is a certificate that is not signed by a certificate authority; in practice, you wouldn't use such a certificate in production, but it is fine for a local setup.
Try out the command:
$ demo cert generate
You should see something like this:
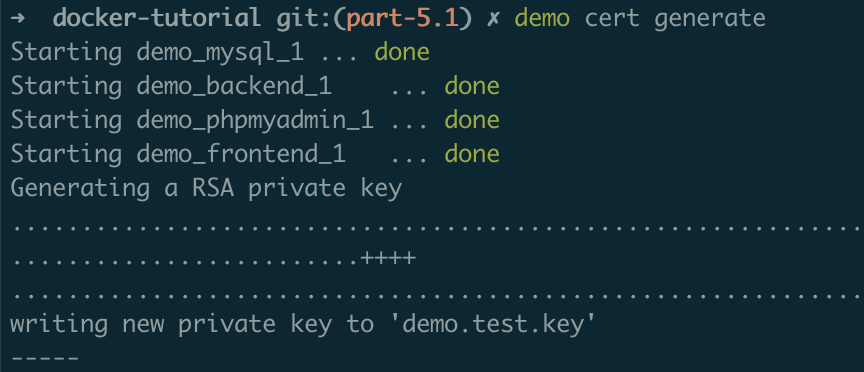
The resulting files are generated in the container's /etc/nginx/certs folder, which, as per docker-compose.yml, corresponds to our local .docker/nginx/certs directory. If you look inside that local directory now, you will see a couple of new files – demo.test.crt and demo.test.key.
Your overall file structure should now look like this:
docker-tutorial/
├── .docker/
│   ├── backend/
│   ├── mysql/
│   └── nginx/
│       ├── certs/
│       │   ├── .gitignore
│       │   ├── demo.test.crt
│       │   └── demo.test.key
│       ├── conf.d/
│       └── Dockerfile
├── src/
├── .env
├── .env.example
├── .gitignore
├── demo
└── docker-compose.yml
Installing the certificate
Let's now implement the cert_install function, still in the demo file (after cert_generate):
1 2 3 4 5 6 7 8 9 10 11 | # Install the certificate
cert_install () {
if [[ "$OSTYPE" == "darwin"* ]]; then
sudo security add-trusted-cert -d -r trustRoot -k /Library/Keychains/System.keychain .docker/nginx/certs/demo.test.crt
elif [[ "$OSTYPE" == "linux-gnu" ]]; then
sudo ln -s "$(pwd)/.docker/nginx/certs/demo.test.crt" /usr/local/share/ca-certificates/demo.test.crt
sudo update-ca-certificates
else
echo "Could not install the certificate on the host machine, please do it manually"
fi
}
|
If you're on macOS or on a Debian-based Linux distribution, this function will automatically install the self-signed certificate on your machine. Unfortunately, Windows users will have to do it manually, but with the help of this tutorial the process should be fairly straightforward (you should only need to complete it roughly halfway through, up to the point where it starts talking about the Group Policy Object Editor).
Using WSL? Even if you run your project through WSL and the certificate seemingly installs properly on your Linux distribution, you're most likely still accessing the URL via a browser from Windows. For it to recognise and accept the certificate, you will need to copy the corresponding file from Linux to Windows and proceed with the manual installation as described in the aforementioned tutorial.
Let's break the cert_install function down: it first verifies whether the current host system is macOS by checking the content of the pre-defined $OSTYPE environment variable, which will start with darwin if that's the case. It then adds the certificate to the trusted certificates.
If the current system is Linux, the function will create a symbolic link between the certificate and the /usr/local/share/ca-certificates folder, and run update-ca-certificates so it is taken it into account. Note that this code will only work for Debian-based distributions – if you use a different one, you will need to adapt the if condition accordingly, or add extra conditions to cover more distributions.
Since the sudo program is used in both cases, running the command will probably require you to enter your system account password.
Let's try to install the certificate (you can also run this on Windows, but you'll be invited to install the certificate manually as mentioned earlier):
$ demo cert install
If all went well, it should now appear in the list of certificates, like in macOS' Keychain Access:

The Nginx server configurations
Now that our certificate is ready, we need to update the Nginx server configurations to enable HTTPS support.
First, update the content of .docker/nginx/conf.d/backend.conf:
1 2 3 4 5 6 7 8 9 10 11 12 13 14 15 16 17 18 19 20 21 22 23 24 25 26 27 28 29 30 31 32 33 34 35 36 37 38 39 40 41 42 | server {
listen 443 ssl http2;
listen [::]:443 ssl http2;
server_name backend.demo.test;
root /var/www/backend/public;
ssl_certificate /etc/nginx/certs/demo.test.crt;
ssl_certificate_key /etc/nginx/certs/demo.test.key;
add_header X-Frame-Options "SAMEORIGIN";
add_header X-Content-Type-Options "nosniff";
index index.php;
charset utf-8;
location / {
try_files $uri $uri/ /index.php?$query_string;
}
location = /favicon.ico { access_log off; log_not_found off; }
location = /robots.txt { access_log off; log_not_found off; }
error_page 404 /index.php;
location ~ \.php$ {
fastcgi_pass backend:9000;
fastcgi_param SCRIPT_FILENAME $realpath_root$fastcgi_script_name;
include fastcgi_params;
}
location ~ /\.(?!well-known).* {
deny all;
}
}
server {
listen 80;
listen [::]:80;
server_name backend.demo.test;
return 301 https://$server_name$request_uri;
}
|
Then, change the content of .docker/nginx/conf.d/frontend.conf to this one:
1 2 3 4 5 6 7 8 9 10 11 12 13 14 15 16 17 18 19 20 21 22 23 24 | server {
listen 443 ssl http2;
listen [::]:443 ssl http2;
server_name frontend.demo.test;
ssl_certificate /etc/nginx/certs/demo.test.crt;
ssl_certificate_key /etc/nginx/certs/demo.test.key;
location / {
proxy_pass http://frontend:8080;
proxy_http_version 1.1;
proxy_set_header Upgrade $http_upgrade;
proxy_set_header Connection 'upgrade';
proxy_cache_bypass $http_upgrade;
proxy_set_header Host $host;
}
}
server {
listen 80;
listen [::]:80;
server_name frontend.demo.test;
return 301 https://$server_name$request_uri;
}
|
Finally, replace the content of .docker/nginx/conf.d/phpmyadmin.conf with the following:
1 2 3 4 5 6 7 8 9 10 11 12 13 14 15 16 17 18 19 20 21 22 23 24 25 | server {
listen 443 ssl http2;
listen [::]:443 ssl http2;
server_name phpmyadmin.demo.test;
root /var/www/phpmyadmin;
index index.php;
ssl_certificate /etc/nginx/certs/demo.test.crt;
ssl_certificate_key /etc/nginx/certs/demo.test.key;
location ~* \.php$ {
fastcgi_pass phpmyadmin:9000;
root /var/www/html;
include fastcgi_params;
fastcgi_param SCRIPT_FILENAME $document_root$fastcgi_script_name;
fastcgi_param SCRIPT_NAME $fastcgi_script_name;
}
}
server {
listen 80;
listen [::]:80;
server_name phpmyadmin.demo.test;
return 301 https://$server_name$request_uri;
}
|
The principle is similar for the three of them: a second server block has been added at the end, listening to traffic on port 80 and redirecting it to port 443, which is handled by the first server block. The latter is pretty much the same as the one it replaces, except for the addition of the ssl_certificate and ssl_certificate_key configuration keys, and the appearance of http2.
We were unable to use HTTP2 so far because, while encryption is not required by the protocol, in practice most browsers only support it over an encrypted connection. By introducing HTTPS to our setup, we can now benefit from the improvements of HTTP2.
We also need to make a quick change to src/frontend/src/App.vue, where the backend endpoint should now use HTTPS instead of HTTP:
...
mounted () {
  axios
    .get('https://backend.demo.test/api/hello-there')
    .then(response => (this.msg = response.data))
}
...
And to update the port in src/frontend/vite.config.js:
...
  server: {
    host: true,
    hmr: {port: 443},
    port: 8080,
    watch: {
      usePolling: true
    }
  }
...
Looks like we're ready for a test! Restart the containers for the changes to take effect:
$ demo restart
Access frontend.demo.test (remember that it can take a few seconds for Vue.js' development server to start – you can run demo logs frontend to monitor what's going on): you should automatically be redirected from HTTP to HTTPS, and the website should display correctly.
We're encrypted!

Not working in your browser? While Chrome seems to accept self-signed certificates with no fuss across platforms, Firefox may give you a security warning. If that's the case, you may need to set the security.enterprise_roots.enabled property to true from the about:config page – once that's done, restarting the browser is usually enough to make the warning go away (read more about this configuration setting here).
Safari is proving more difficult, however; on macOS (and maybe on other systems too), even after ignoring the security warning and while the certificate is accepted for regular browser requests, AJAX requests are still failing. I haven't found a solution yet, but I haven't spent much time looking into it either because, if I'm honest, I don't really care whether or not it works on Safari (at least locally). If you find a way though, please let me know about it in the comments.
Finally, if your browser still doesn't accept the certificate, I can only advise you to search for solutions on how to install a self-signed certificate for your specific setup online. Behaviour can vary based on the system, the browser and the browser's version, and it would be vain to try and list all of the potential issues here. Like I said at the beginning of this article, unfortunately, local HTTPS is not always straightforward.
Automating the process
Now that we've got the Bash functions to generate and install the certificate, we can integrate them into the project's initialisation process.
Open the demo file again and update the init function:
# Initialise the Docker environment and the application
init () {
    env \
        && down -v \
        && build \
        && docker compose run --rm --entrypoint="//opt/files/init" backend \
        && yarn install

    if [ ! -f .docker/nginx/certs/demo.test.crt ]; then
        cert_generate
    fi

    start && cert_install
}
The function will now check whether there's a certificate in the .docker/nginx/certs folder already, generate one if there isn't, and then proceed with starting the containers and install the certificate. In other words, all of this will now be taken care of by the initial demo init.
Container to container traffic
The above setup is suitable for most cases, but there's a situation where it falls short, and that is whenever a container needs to communicate with another one directly, without going through the browser. Let me walk you through this.
First, bring up the project if it's currently stopped (demo start) and access the backend container:
$ docker compose exec backend sh
From there, try and ping the frontend container:
$ ping frontend
The ping should respond with the frontend container's private IP, which is the expected behaviour. Try pinging the frontend again, this time using the domain name:
$ ping frontend.demo.test
We also get a response, but from localhost, which is not quite right: we should get the same private IP address instead.
Let's run a few more tests, still from the backend container, but using cURL commands:
$ curl frontend
Response:
curl: (7) Failed to connect to frontend port 80: Connection refused
This is expected because the frontend container is set up to listen on port 8080:
$ curl frontend:8080
This command correctly returns the frontend's HTML code. Let's try again, but this time using the domain name:
$ curl frontend.demo.test
Response:
curl: (7) Failed to connect to frontend.demo.test port 80: Connection refused
Same issue as above – we should be targeting port 8080 instead:
$ curl frontend.demo.test:8080
Response:
curl: (7) Failed to connect to frontend.demo.test port 8080: Connection refused
Still not working... what's going on?
Containers identify each other by name (e.g. frontend, backend, mysql, etc.) on the network created by Docker Compose. The domain names we defined for the frontend and the backend (frontend.demo.test and backend.demo.test) are recognised by our local machine because we updated its hosts file, but they have no meaning in the context of Docker Compose's network. In other words, for these domain names to be recognised on that network, we'd need to update the containers' hosts files as well, and we'd have to do it every time the containers are recreated.
Thankfully, Docker Compose offers a better solution for this, in the form of network aliases. Aliases are alternative names we can give services and by which their containers will be discoverable on the network, in addition to the service's original name. These aliases can be domain names.
In order to emulate a production environment as closely as possible, we should assign the frontend's domain name to the Nginx service, rather than to the frontend service directly.
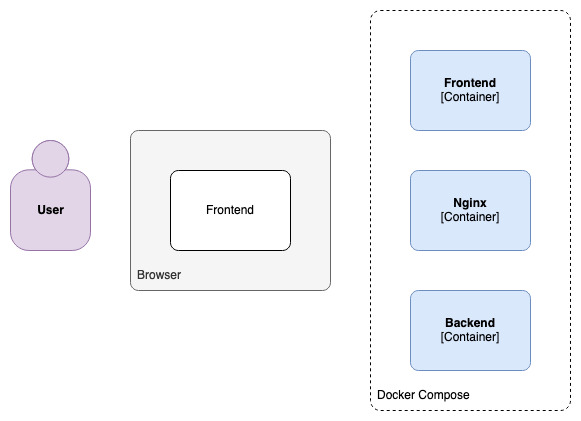
Things are probably getting a bit confusing, so let's bring back our diagram from earlier:
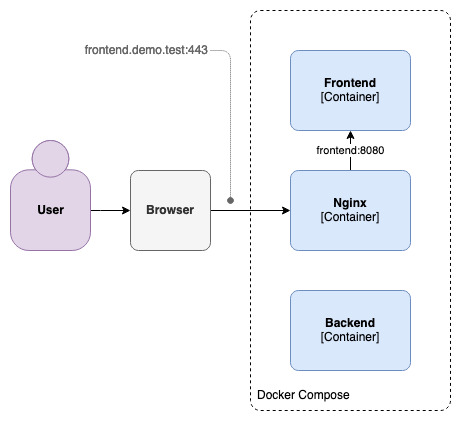
This slightly updated version essentially describes what happens when we initially access frontend.demo.test: the browser asks Nginx for the frontend's content on port 443; Nginx recognises the domain name, and proxies the request to the frontend container on port 8080, which in turn returns the files for the browser to download.
From then on, a copy of the frontend is running in the browser:
As the end user interacts with the frontend, requests are made to the backend:
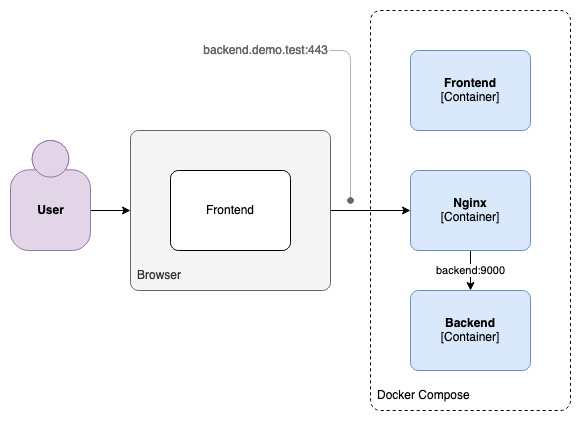
These requests come to the Nginx container on port 443, where Nginx recognises the backend's domain name and proxies the requests to the backend container, on port 9000.
What we're trying to achieve here, however, is direct communication between the backend and frontend containers, without involving the browser:
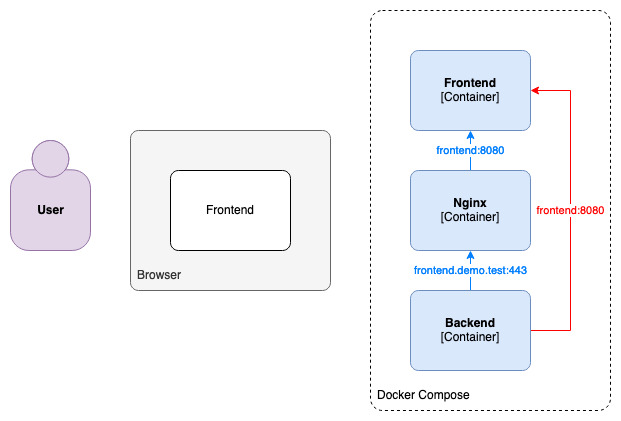
The red route (the arrow on the right-hand side) is already functional: as the frontend and backend containers are on the same Docker Compose network, and as they can identify each other by name on it, the backend is able to reach the frontend directly on port 8080. In a production environment, however, the frontend and the backend are unlikely to be on such a network, and more likely to reach each other by domain name (I am voluntarily leaving out non-HTTP protocols here).
They would basically use a similar route as the browser, through Nginx and via HTTPS – the blue route.
Therefore, we want the frontend's domain name to resolve to the Nginx container and not to the frontend's directly, meaning the domain name alias should be assigned to the Nginx service.
Let's add a networks section to it, in docker-compose.yml:
# Nginx Service
nginx:
  build: ./.docker/nginx
  ports:
    - 80:80
    - 443:443
  networks:
    default:
      aliases:
        - frontend.demo.test
  volumes:
    - ./src/backend:/var/www/backend
    - ./.docker/nginx/conf.d:/etc/nginx/conf.d
    - phpmyadmindata:/var/www/phpmyadmin
    - ./.docker/nginx/certs:/etc/nginx/certs
  depends_on:
    - backend
    - frontend
    - phpmyadmin
For the change to take effect, the network has to be recreated:
$ demo down && demo start
We can now proceed with the same tests as earlier, starting with the ping:
$ docker compose exec backend sh
$ ping frontend.demo.test
The command now responds with a proper private IP address. Let's try with cURL:
$ curl frontend.demo.test
We do get a response, but a 301 Moved Permanently one, which is expected – if you remember, we added a second server block to each Nginx config, responsible for redirecting HTTP traffic to HTTPS.
Let's hit the HTTPS URL instead:
$ curl https://frontend.demo.test
Response:
curl: (60) SSL certificate problem: self signed certificate
We're now getting to the issue I mentioned at the very beginning of this section. Our browser knows and accepts the self-signed certificate, because we installed it on our local machine; on the other hand, the backend container has no idea where this certificate comes from, and has no reason to trust it.
The easy way to circumvent this is by ignoring the security checks altogether:
$ curl -k https://frontend.demo.test
While this solution works, it is not recommended for obvious security reasons, and you won't always have the luxury of setting the options as you see fit (especially if the call is made by a third-party package).
What we need to do, really, is to install the certificate on the backend container as well, so it can recognise it and trust it the way our local machine does.
To do that, we need to mount the directory containing the self-signed certificate onto the backend container. Exit the container (by running exit or by hitting ctrl + d) and update docker-compose.yml:
# Backend Service
backend:
  build:
    context: ./src/backend
    args:
      HOST_UID: $HOST_UID
  working_dir: /var/www/backend
  volumes:
    - ./src/backend:/var/www/backend
    - ./.docker/backend/init:/opt/files/init
    - ./.docker/nginx/certs:/usr/local/share/ca-certificates
  depends_on:
    mysql:
      condition: service_healthy
Save the file and restart the containers:
$ demo restart
Access the backend container once again, and install the new certificate (you can ignore the warning):
$ docker compose exec -u root backend sh
$ update-ca-certificates
Note the -u option in the first command above – update-ca-certificates necessitates root privileges, which the container's default user (demo) doesn't have. The -u option allows us to access the container as a different user – here, root – so we can run update-ca-certificates with the right permissions.
Try the cURL command one more time:
$ curl https://frontend.demo.test
You should finally get the frontend's HTML code.
There's one last thing we need to do before wrapping up. Update the cert_install function in the demo file:
# Install the certificate
cert_install () {
  if [[ "$OSTYPE" == "darwin"* ]]; then
      sudo security add-trusted-cert -d -r trustRoot -k /Library/Keychains/System.keychain .docker/nginx/certs/demo.test.crt
  elif [[ "$OSTYPE" == "linux-gnu" ]]; then
      sudo ln -s "$(pwd)/.docker/nginx/certs/demo.test.crt" /usr/local/share/ca-certificates/demo.test.crt
      sudo update-ca-certificates
  else
      echo "Could not install the certificate on the host machine, please do it manually"
  fi

  docker compose exec -u root backend update-ca-certificates
}
After installing the certificate on the local machine, the function will now also do the same on the backend container.
Why is this important? I must confess that the example above isn't the most relevant, as in practice I can't really think of any reason why the backend would need to interact with the frontend in such a way. Container-to-container communication is not a rare feat, however: typical use cases comprise applications querying an authentication server (think OAuth), or microservices communicating through HTTP. I simply didn't want to make this tutorial any longer by introducing another container.
That being said, I would recommend installing the certificate on a container only if it's really necessary, as this is an extra step one can easily forget. If you need to recreate the container for some reason, you'd also have to remember to run demo cert install; at the time of writing, there is no such thing as container events – like container creation – to hook on to in order to automate this.
Conclusion
Let's be honest: dealing with HTTPS locally is still a pain in the neck. Unfortunately, a development environment would not be complete without it, since it's pretty much become a modern Internet requirement.
There is a silver lining to this, however: now that encryption is out of the way, all that's left of this tutorial series is the fun stuff. Rejoice!
In the next part, we will see how to expose a local container to the Internet, which comes in handy when testing the integration of a third-party service. Subscribe to email alerts below so you don't miss it, or follow me on Twitter where I will share my posts as soon as they are published.
You can also subscribe to the RSS or Atom feed, or follow me on Twitter.